Using FTP Server Access for Site Development with UltraDev
by Judy Fontanella
Part B - Connecting to your Database
Preparation
In this section, you will create the connection between your database on the
server and your Web page. The connection code that is used to connect to your
database is very important. It tells the server important information such as
where your database is located and what kind of database it is. That allows
the server to know which database driver to use and where to find the files.
There are many different databases and types of connections that you can use.
I will show you how to connect to an Access database file that has been uploaded
to your server. Many of the books about UltraDev use Access for practice because
that eliminates having to rely on more expensive database servers such as MS
SQL Server or Oracle. It is also relatively easy and inexpensive to find hosting
that supports Access. You can download the Links.mdb
Access database file that I have created for this tutorial.
The specific connection type that I will use is a custom connection string,
as opposed to a DSN. The connection string that uses the Jet driver for Access
has a few important advantages. It's a fast connection, and you can use it without
having your host set up a special DSN for you on the server. You can use as
many databases as you want without having to wait for service from your host.
Under some hosting plans, using the custom connection string may save you money
as well as time. Please note that if you are using Cold Fusion or JSP instead
of ASP, you will have to use a DSN as your connection type. If you would like
to know more about how to set up DSN's or other types of connections for Access
or other databases, please visit the Basic UltraDev site at: http://www.basic-ultradev.com/articles/ADOConnections/
.
Before you can create a connection to your database, you have to be sure all
of your files are in the right places. Upload your Access file to the server
now. Be sure that you put it in a folder that it will stay in for the life of
your site, because your connection string will use the exact location of the
database on the server. The folder containing your database file will need special
permissions set if you plan on writing to your database. Either you or your
host will need to put both read and write permissions for the anonymous user
(IUSR) on that folder. If the permissions are not set correctly, you will be
able to read from your database file, but unable to add or modify records from
the Web site. I have set up a folder called "Databases" to house my
database files.
Determining the Physical Path to your Database File.
Before you write the connection string to your database file, you will need
to know the physical path to your database file. If you are using an ASP server,
you can find the physical path to your Databases folder by following the procedure
outlined below. You will use this path in the connection string.
- Open a new, blank file. Save it as mappath.asp in your Databases
folder.
- Type the following ASP code into the body section of the CODE VIEW of your
document. Do NOT type the code into the design view:
<%= Server.MapPath(Request.ServerVariables("Path_Info")) %>
- Save your file and upload it to the Databases folder on your Web site.
- Browse to the file with your browser. The URL should be: http://www.mydomain.tld/Databases/mappath.asp.
Adjust this URL to reflect the URL of the Databases folder on your site.
- When the file opens, you should see the physical path to this mappath.asp
file displayed in your browser window. It should say something like: "E:\Inetput\WWWroot\mydomain\Databases\mappath.asp."
Since your database files will be in the same folder as this mappath.asp file,
you can use this address in your connection string after "Data Source=".
Just remember to substitute the name of your database file (whatever.mdb)
for the name of the mappath.asp file at the end of the string. So, if
the path that displayed in your browser window was "E:\Inetput\WWWroot\mydomain\Databases\mappath.asp",
and your database name was "Links.mdb", the physical path
to your database file would be: "E:\Inetput\WWWroot\mydomain\Databases\Links.mdb."
Note: If your databases folder is located in a directory above the
main folder of your site, you will not be able to place this mappath file
in the databases folder and then browse to it. You can't browse to a file
above the main root folder of your site. That is good protection for your
database file, because no one can download the whole database by typing the
address into their browser. It makes this step a little more difficult, however.
What I do when faced with this situation is put the mappath.asp file in my
main folder. Then, I can browse to it. It may tell me that my mappath file
is located at: E:\Inetput\WWWroot\mydomain\html\mappath.asp.
If my database file is located in the private folder that is on the same level
as the html folder, I will adjust the path to my database file to reflect
this. The database path is: E:\Inetput\WWWroot\mydomain\private\whatever.mdb.
Creating Your Connection
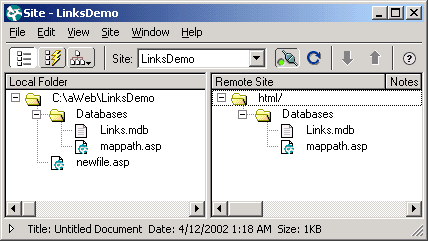
- Open your site folder and connect to the server. Make one last check to
be sure everything on your site is in the proper folders. Note that I have
the database file uploaded to the Databases folder on the server. If you have
a site where the database file is stored in a folder above the main root folder
of your site, you will have to use another FTP program to upload you database
file to the proper location.

- Open any page that is in on your site by double clicking it. If you don't have any files, yet, create a new blank file and save it in your site folder.
- Go to Modify ->Connections.
- Click the New button on the right.
- Select Custom Connection String if you are offered a choice between that or a Data Source Name (DSN).
- You will be presented with the following dialog box. Fill it out very carefully. You will be substituting the physical path to your database file for the one that is shown. Remember that you found that path by using the mappath.asp file in the section above.

Connection Name: Use a name that you will recognize. It is convention
to start the name of a database connection with the "conn" prefix.
For the Links database, name you connection "connLinks."
Connection String: Provider=Microsoft.Jet.OLEDB.4.0; Data Source=E:\Inetpub\WWWroot\MyDomain\Databases\Links.mdb
Note: The connection string is all on one line even though it may wrap in your browser window. Replace the part after the "Data Source=" with the physical path to your database file. There are exactly two spaces in the connection string. One is right after the ";" and the other is right after the word "Data". You must have just those two spaces. Where it says: "UltraDev Should Connect:" select "Using Driver on Application Server".
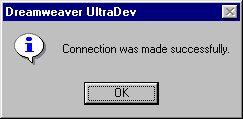
- Click the Test button. You should see the following message:

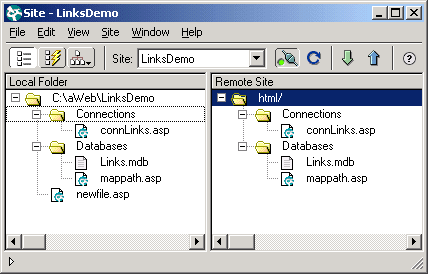
- Now, if you look at the files that make up your site, you should see a new
folder called "Connections". This folder holds files with
the connection information for each of the databases that you will work with
on your site. The files are used as include files. UltraDev places them on
each page that uses data from the database. The connection files must reside
on the server, as well as your local hard drive. Be sure that the Connection
folder, along with its contents, is uploaded to the server before you procede
to the next step.

Now you are ready to actually work with your data on your Web pages. All that
is left is to create a new recordset and put the data on your page. The next
section of the tutorial will show you how to do just that.
Copyright 2002, Judy Fontanella, All Rights Reserved
Judy Fontanella owns her own Web design company called ArtBytes in San
Diego, California. She also teaches both online and face-to-face Web
design classes for Palomar Community College in San Marcos, California.
[an error occurred while processing this directive]
|